Viewing entries tagged
stuffed

Comment

Tortilla-Wrapped Poblanos Stuffed with Corn and Almond Pâté

Hey, welcome. Consider following MSV on Twitter and subscribing to the RSS feed, or sign up for email updates right over here.

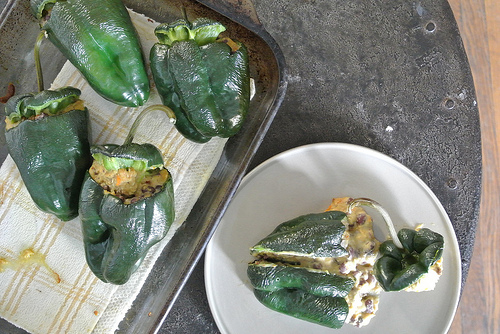
AKA the lazy vegan's chiles rellenos. Like any stuffed dish, these poblanos—filled with a delightfully rich and comforting mix of creamy almond pâté and sweet corn kernels—take a bit of effort to prep, but they're totally do-able, even on a weeknight. Also, best entertaining dish ever—serve with a little beans and rice and Palomas, with a mezcal digestif, and done. The peppers take a bit of time to cook in the oven, so if you really want to revel in your dinner, you have plenty of time to make a batch of fresh tortillas while that goes on. If you just can't find the energy, store-bought guys will do the trick on any given Tuesday.

I will note that there's a little messing with stuff in a hot skillet in order to get that tortilla glued around the roasted pepper, so if you're a brand-new cook, or tend to be extra timid with such things, you may want to wait until you have a day off and/or a kitchen buddy on hand. But it's well worth the effort, and way easier than frying battered peppers, so I encourage you not to let that deter you from trying these out.

To give credit where it's due, I've long had the notion of stuffed poblano tamales in my head, but I've been out of the tamal groove (tragedy!), and so they remained only a tasty dream. Then at La Cocina de Frida in a Oaxaca market, something was brought to the table.

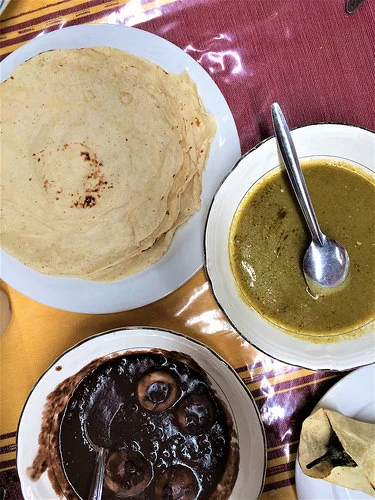
See that little guy all wrapped up in the lower right corner? Genius. And so simple. I didn't taste that dish, since the poblano there was stuffed with cow's milk cheese, but I thought, why not? Why not, indeed?

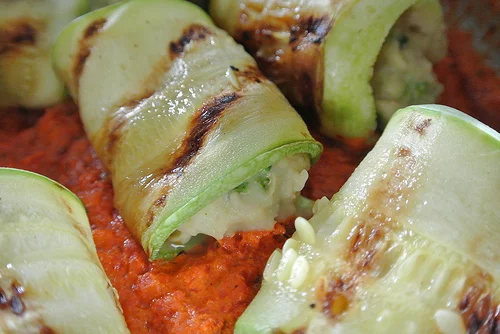
When you shop for peppers, be sure to grab ones that will fit comfortably in your tortillas. I generally believe thick tortillas to be the absolute end, but in this case, a more standard thickness (or, if you're making your own, even a little thinner than store-bought) is the perfect amount of carbs to go along with your little green dreamboat. So for maximum deliciousness, you'll want a single tortilla to wrap around the pepper and seal in front (unlike that picture up top where there's an extra tortilla glued in at the bottom because that pepper was too large—whoops).

Look at that guy. So good. First one to try it on an outdoor grill instead of a skillet wins summer.

Tortilla-Wrapped Poblanos Stuffed with Corn and Almond Pâté

Print the recipe

serves 4

4 small-medium poblano peppers, washed and dried

100 grams blanched almond meal

3 TBSP lime juice

1/3 cup unsweetened soy milk

2 TBSP canola (or other neutral vegetable) oil

1 scallion, trimmed and thinly sliced

1/2 tsp salt

1/2 tsp dried Mexican oregano

2/3 cup frozen (or fresh) sweet corn kernels

olive oil, for drizzling

4 corn tortillas, freshly made or store-bought

1 tsp all-purpose flour

1 tsp water

Begin by preparing the peppers. Slice the pepper lengthwise down the center, stopping before you get to the tip. Make two more cuts at the top, cross-wise, to give yourself some room to work, but leave the back half of the pepper top attached. Use a paring knife to cut away the seeds and veins, as best you can. Repeat with remaining peppers and set aside.

Heat oven to 400. Have an 8x8" square (or similarly-sized) nonstick dish ready.

Add almond meal, lime juice, milk, oil, scallion, salt, and oregano to a food processor and process until smooth. Remove blade and stir in corn. Spoon mixture into peppers. Do not overstuff, since the almond mixture will puff a bit during cooking.

Transfer filled peppers to baking dish and drizzle lightly and evenly with olive oil. Bake 45 minutes, until filling is cooked (it will be creamy, but not wet) and peppers are roasted and well browned in spots. Set aside.

When ready to serve, heat a nonstick skillet over medium heat. While it heats, stir together flour and water in a small bowl to form a paste.

Add a tortilla to the skillet to warm it until pliable, just about half a minute. Carefully place a pepper atop it, cut-side up. Use tongs to pull one side of the tortilla up over the pepper and hold it in place with your hand. Use a finger to spread a dollop of flour paste on the top of the tortilla edge, then pull the other side of the tortilla up (using the tongs again) and press gently to glue it in place. With still holding the tortilla edges to keep them together, carefully turn the whole thing over so that the folded side is now at the bottom of the skillet and press very gently to ensure both ends are secured by the weight of the pepper. (This sounds far more complicated than it is—do it once and you'll have it down). The heat will take care of the rest and seal your tortilla once the paste is cooked. Let cook a couple of minutes, until golden, then carefully flip and brown the other side. Carefully transfer to a serving dish with a wide spatula. Repeat with remaining peppers and serve.

Comment

Comment

Oaxacan Cornbread-Stuffed Roasted Poblanos

Hey, welcome. Consider following us on Twitter and subscribing to our RSS feed, or sign up for email updates from the Home Page.

oaxacan cornbread-stuffed roasted poblanos table.jpg

These roasted poblanos, filled with a savory, fruity, cornbread stuffing, make a terrific main dish for any fall entertaining you may have on the calendar. The apples and prunes pair perfectly with the fiery bits of the peppers, while the cornbread provides comforting heft and texture. Throw in a healthy amount of onion and garlic for heady aroma, and you've got yourself a feast.

Because there are so many components, this dish does require a fair amount of time to assemble. Make the cornbread and wild rice a day or two in advance to make prepping these peppers substantially easier. In a pinch, you can omit the rice.

These peppers are best served fresh, but if you have leftovers, they freeze reasonably well and make for satisfying, effortless dinners. Reheat them, wrapped loosely in foil, in the oven for 45-55 minutes, until heated through.

oaxacan cornbread-stuffed roasted poblanos detail.jpg

Oaxacan Cornbread-Stuffed Roasted Poblanos

Print the recipe

yields 10 peppers, serves 5, stuffing adapted from Saveur

1 cup water

1/4 cup dried wild rice

1/2 loaf (generous 1/2 lb) cornbread, cut into 3/4-inch dice

4 TBSP olive oil, divided, plus another 1-2 tsp

1 large white onion, finely chopped

2 cloves garlic, minced

1 rib celery, thinly sliced

1 large (7-8 oz) tart apple, such as Granny Smith, cored and chopped

3 oz pitted prunes (about 12), quartered

1/2 tsp ground cumin

1/4-1/2 tsp black pepper, to taste

1/4 cup finely chopped flat-leaf parsley

1/2 TBSP orange zest, from about half an orange

fine sea or kosher salt, to taste

10 poblanos (about 5 inches long with a 2-3-inch-wide top)

Bring the cup of water to boil and add the wild rice. Cover, reduce heat to low and cook until tender but not too soft, about 50 minutes. Pour off any excess liquid and set aside.

Meanwhile, dry the diced cornbread on a cookie sheet in a 400-degree oven until gently toasted, 10-12 minutes. Transfer to a large mixing bowl and set aside.

Heat 2 TBSP olive oil in a large skillet over medium heat. Add the onions, garlic, and celery, and cook until soft, about 10 minutes. Add the apple, cover, reduce heat to medium-low and let cook 5 minutes. Remove cover, raise heat to medium, add the prunes, cumin, pepper, parsley, and orange zest. Stir well and cook until the mixture is hot and there is no water in the bottom of the skillet, 2-3 minutes. (The mixture will still be moist, but the bottom of the skillet should not have any pooled liquid remaining.)

Add the contents of the skillet to the cornbread, season generously with salt, add the remaining 2 TBSP olive oil, and stir gently to combine. Gently break up any large chunks of cornbread with your spoon, but take care not to reduce the mixture to crumbs. Set aside.

Cut a hole around the stem of a pepper. Remove and reserve the stem, (shake off loose seeds, if any, from the stem, but mostly these will be anchored tight--don't worry about those). With a spoon, scrape out any thick membrane and seeds from the inside of the pepper. Replace the top, set aside, and repeat with remaining peppers.

Pack each pepper with about 1/3 cup of stuffing, pressing gently to fill, replace the stem, and arrange in a 9x13 baking dish. Drizzle with 1-2 tsp of olive oil and sprinkle on a generous pinch of coarse salt. Bake at 400 degrees until dark, very tender, and blistered in spots, 30-40 minutes. Serve hot.

Comment

Comment

Party Animals No. 20: Polenta Chiles Rellenos with Pineapple-Chipotle-Pepita Salsa for Grilling with Pals

Hey, welcome. Consider subscribing to our RSS feed and following us on Twitter.

polenta chiles rellenos with pineapple-chipotle-pepita salsa table.jpg

Stuffed vegetables are a great, filling grilling option. Here, creamy, savory polenta poured in tender peppers is served on a saucy-chunky blend of sweet seared pineapple, chipotles en adobo, and toasted pepitas. Brunch, dinner, whenever. Using our standard healthy skin-on, top-loaded stuffing method, along with quick-cooking yellow corn grits, makes the peppers a snap to assemble. Have a cocktail and chips with salsa to nibble while you wait for the peppers to cook. Serve with refritos and rice for a seriously satisfying and spicy meal.

And, naturally, they can be roasted in the oven, too. 

polenta chiles rellenos with pineapple-chipotle-pepita salsa messy detail.jpg

Grilled (or Roasted) Polenta Chiles Rellenos with Pineapple-Chipotle-Pepita Salsa

Print the recipe 

serves 4 

 For the peppers:

4 poblano peppers, 5-6 inches in length (2-3 inches wide) 

2 cups water

1/3 cup quick-cooking yellow corn grits / polenta

3 TBSP nutritional yeast

1/2 tsp garlic powder

1/2 tsp pimenton

1/2 tsp dried oregano

1/4 tsp dried marjoram

1/2 tsp fine sea or kosher salt

1 TBSP extra virgin olive oil (optional) 

For the salsa

1/4 cup raw pepitas

4-5 ounces large pineapple chunks (about 1/2 cup chopped) 

2 chipotles en adobo

1/4 tsp fine sea or kosher salt

Heat your grill, or heat your oven to 400 degrees.

Cut a hole around the stem of a pepper. Remove the stem, reserving, and pour all the seeds out of the pepper (shake off loose seeds, if any, from the stem, but mostly these will be anchored tight--don't worry about those). With a knife, scrape/cut out any thick membrane from the inside of the pepper, being careful not to cut through. Set aside with the top so you can match them up later and repeat with remaining peppers. 

Bring 2 cups of water to a boil. While it heats, whisk together the polenta, nutritional yeast, garlic powder, pimenton, oregano, marjoram, and salt in a bowl. When the water begins to boil, whisk in the mixture in small, steady stream. Bring back to bubbling, reduce heat to low, cover, and simmer 5 minutes, stirring occasionally. Remove the lid and cook, stirring, one additional minute. Remove from heat and stir in olive oil, if using (it adds a touch of richness, but isn't necessary). 

Spoon the polenta into the peppers, filling 1/2-3/4 inch from the top, and place the stem firmly back in place--it should create a pretty good seal. Grill until blackened and tender, about 20 minutes, flipping carefully halfway through (if you squeeze them, you'll lose filling). If roasting, transfer to a baking sheet and bake until tender and darkened, 30-40 minutes.

While the peppers cook, heat a dry skillet over medium heat and add the pepitas. Toast, tossing frequently, until they begin to pop and turn golden, 3-4 minutes. Transfer to a plate to cool a bit. Add to the hot pan the pineapple chunks and sear until lightly browned, about 2 minutes on both sides. Transfer the pineapple to a mortar and add the chipotles (remove the seeds first for a milder heat, if needed) and salt.  

Use a coffee grinder to grind the toasted pepitas to a powder. Add to the mortar and pound with the pestle until saucy, but still chunky, making sure the chipotles are well broken up. Alternately, pulse in a small food processor. 

Divide the salsa evenly among four plates and top each with a pepper. 

Comment

Comment

Creamy White Bean-Broccoli Zucchini Involtini with Roasted Red Pepper Puree

Hey, welcome. Consider subscribing to our RSS feed and following us on Twitter.

zuchinni rollatini with red pepper sauce table.jpg

Equal parts fresh and convenient, this brilliantly colored zucchini involtini is as satisfying to serve to loved ones as it is to dig into on your own. Start with fat, firm zucchini, broccoli, and a pile of garlic from the freshest source you can find, then let a jar of roasted red peppers pair up with a touch of creamy tahini to produce a dead simple, eye-popping sauce. A can of white beans pureed with comforting seasonings provides a quick and substantial filling in which to suspend bright green bits of broccoli.

zuchinni rollatini with red pepper sauce produce.jpg

If you're comfortable multi-tasking, you'll find this provides an impressive presentation for not a lot of effort once the produce is chopped. If you're new to the kitchen, it's definitely do-able, but allow yourself a bit of extra time to organize the components.

As ever, we used our electric countertop grill to prep the zucchini strips before rolling. You can, of course, turn to an outdoor grill or steam the zucchini until pliable.  Note that we used a particularly fat variety of zucchini (shown above). If you can find large zucchini, the dish will be faster to make.

zuchinni rollatini with red pepper sauce detail.jpg

Creamy White Bean-Broccoli Zucchini Involtini with Roasted Red Pepper Puree

Print the recipe 

serves 3-4 

For the involtini:

1 TBSP olive oil

1 large head garlic, about 10 cloves, minced

1 medium stalk broccoli (9 oz total weight, including stalk), torn into very small florets (2 cups of florets)

1/8-1/4 tsp crushed red pepper, to taste

1 15-oz can navy beans, drained, but not rinsed

1 no-salt-added vegetable bouillon cube

1/4 tsp fine sea or kosher salt

2 TBSP nutritional yeast

freshly cracked black pepper, to taste

15 5-to-6-inch-long zucchini slices, each 1/4-inch thick and about 2 1/2 inches wide, from two very fat zucchini (1 1/2 lb total weight)

For the red pepper puree

1 16-oz jar roasted red peppers, drained (about 4 large peppers, if you prefer to freshly roast them)

1 TBSP tahini

zest of 1 lime

1/4 tsp fine sea or kosher salt

1/2 tsp dried thyme

To begin the filling, heat 1 TBSP olive oil in a small pan. Add the garlic, stir to coat, cover, reduce heat to low, and cook 10 minutes, stirring occasionally. 

Meanwhile, add all red pepper puree ingredients to a food processor and process until very smooth, about 2 minutes, stopping to scrape down the sides halfway through.  

Heat a large skillet over medium heat, add the pepper puree, and cook over medium to medium-low heat until a bit darker and fragrant, but still saucy, 5-7 minutes. Turn off heat and cover. 

When the garlic is ready, add the broccoli florets and red pepper flakes. Cook until bright green and crisp-tender, stirring frequently, about 5 minutes (again, the florets should be very small, so they cook quickly). 

Meanwhile, preheat a countertop electric grill. While it heats, quickly rinse and wipe dry the food processor and add to it the beans, bouillon cube, salt, nutritional yeast, and pepper.  Puree 30 seconds, scrape down the sides and bottom to ensure the bouillon cube isn't sticking, and puree another 30 seconds, until smooth. Stir the broccoli-garlic mixture into the bean puree.

When the grill is ready, working in batches, add the zucchini slices in a single layer, close the grill, and cook 5 minutes, undisturbed. They should be visibly seared, fragrant, and pliable, but not mushy.

Place a spoonful of filling (about 2 tsp) on one end of a zucchini strip and roll to close. Place seam-down into the pan with the red pepper puree. Repeat with remaining zucchini slices, cover the pan, turn the heat to medium-low and warm through (it won't take long). Serve immediately.

Comment

Comment

Citrus Couscous Salad with Stuffed Dates

sunny citrus couscous salad with stuffed dates.jpg

Bright, fluffy couscous and warm-colored veg combine to make one seriously sunny salad. The dates--stuffed with Brazil nuts lightly glazed with cranberry and orange--are optional, but a really nice touch if you have time to prepare them. If you don't, in order to maintain the caloric heft, try quickly chopping a handful of nuts and dates and stir them directly into the salad with the vegetables.

sunny citrus couscous salad with stuffed dates detail.jpg

Citrus Couscous Salad with Stuffed Dates

Print the recipe 

serves 4-6 

For the stuffed dates

20 Brazil nuts

generous pinch salt

1/4 tsp oil

juice of half an orange (1/4 cup) 

1/2 cup unsweetened cranberry juice

1/2 cup natural cane sugar

20 dates, sliced cleanly open and pitted

 For the salad:

juice of half an orange, plus enough water to yield 2 1/4 cups

1 tsp ground coriander

1/4 tsp fine sea or kosher salt

1/4 tsp turmeric powder

1 1/2 cups couscous

1 bunch cilantro (about 1/2 loose cup), chopped

1 large red pepper (about 7 oz total weight)

4 medium-large carrots (8 oz total weight) 

2 TBSP extra virgin olive oil

juice of 1 lime

To prepare the dates: Preheat the broiler. Toss together the Brazil nuts, pinch salt, and 1/4 tsp oil. Monitoring closely, broil until just beginning to darken, 5-7 minutes. 

Meanwhile, combine the orange and cranberry juices along with the sugar in a small sauce pan. Simmer for 15 minutes, until thickened. Add the toasted nuts to the cranberry syrup, coat well, and stuff one nut into each date. Set aside.

To prepare the salad: Combine the orange juice and water, coriander, salt, and turmeric in a small pot and bring to a boil. Turn off heat, stir in the couscous and cilantro, cover, and let sit for 10 minutes. 

While the couscous sits, cut the pepper into matchsticks 1 1/2-2" in length and shred the carrots with a peeler, or cut them into matchsticks with a sharp knife. 

Fluff the couscous with a fork and stir in the vegetables. Whisk together the oil and lime juice, stir into the salad thoroughly, and adjust seasoning, if necessary.

Serve warm or at room temperature garnished with the stuffed dates. 


Comment

1 Comment

Stuffed Polenta

herbed polenta stuffed with garlicky greens table.jpg

An easy, tasty solution for an abundance of herbs and spring greens, this stuffed polenta makes a bright, satisfying lunch when paired with fresh fruit. The garlic and rich olive oil flavors work particularly well with spicy greens like arugula, but feel free to use anything you have on hand, including salad greens. 

herbed polenta stuffed with garlicky greens detail.jpg

Stuffed Polenta

Print the recipe

serves 4 

1 TBSP extra virgin olive oil

1 large clove garlic, minced

1 large handful greens, chopped

3 cups water

1/2 tsp salt

1 cup dry polenta (coarse corn meal) 

1/4 cup nutritional yeast

2 TBSP fresh oregano

1 TBSP fresh thyme

Preheat oven to 375 degrees.

Heat the oil over medium heat in a skillet. Add the garlic and cook until fragrant and beginning to soften, a couple of minutes. Add the greens and cook until wilted and brilliant green. Remove from heat and set aside. 

Heat the water and salt in a large sauce pan over medium-high heat. When the water begins to boil, add the polenta in a small, steady stream, whisking constantly. Reduce heat to low and cook, stirring, for 8 minutes. Add the nutritional yeast and fresh herbs and cook for an additional 2 minutes. Remove from heat.

Pour half the polenta into a 9-inch tart (or springform) pan. Spread the greens evenly over the bottom layer, and top with remaining polenta. Bake for 20 minutes, until golden on top. Let cool five to ten minutes before cutting. 

1 Comment

Comment

Bok Choy Stuffed with Two Mushrooms and Cashews

two mushroom and cashew-stuffed bok choy table.jpg

These last weeks in Knoxville have been an emphatic reminder than spring brings as much cool rain as it does sunny afternoons. And so when the first Saturday Market Square Farmers' Market opened on a gray, chilled morning, the pretty adorable head of bok choy we picked up there was headed for a dish that felt substantial and warming. Keeping it simple and reliable, this stuffed bok choy opens to reveal a mound of salty, meaty mushrooms and a smattering of crunchy cashews. All the comfort of Asian lettuce wraps in a stunning presentation. (And unlike lettuce wraps, this knife-and-fork dish can be served worry-free on first dates.)

A note on serving: The amount of time it takes the bok choy to finish in the oven is exactly the amount of time it takes to whip up a batch of miso soup with plenty of cubed tofu and any other garnishes you have on hand, turning this into a protein-rich meal for two. 

two mushroom and cashew-stuffed bok choy detail.jpg

Bok Choy Stuffed with Two Mushrooms and Cashews

Print the recipe

serves 2 

1/2 ounce dried black morel mushrooms (or other dried mushroom) 

1 head bok choy (generous 1/2 lb total weight)

8 oz button mushrooms

1 clove garlic

1 TBSP sesame oil, plus more for baking

1 TBSP low-sodium tamari

1 tsp seasoned rice vinegar

several dashes red pepper flakes, to taste

1/4 cup unsalted cashews, roughly chopped

Preheat the oven to 350. 

Place the morels in a bowl, pour hot water over them, and cover loosely with a towel. Let sit for 30 minutes.

Meanwhile, wash the bok choy, pat dry, and set aside to let dry totally.

Clean the button mushrooms with a slightly damp towel and discard any tough stems. Slice the mushrooms very thinly and mince the garlic.

When the morels are ready, drain them thoroughly (reserving the soaking liquid for soup, straining it before using to remove any bits of dirt), and chop roughly.

Heat the 1 TBSP sesame oil over medium heat. Add the garlic and saute for just a minute, until fragrant. Add the mushrooms and cook until they have released all their water, 3-5 minutes. Add the tamari, vinegar, red pepper, morels, and cashews. Cook until the liquid has evaporated, another 3 minutes (the mixture will still be moist, but there shouldn't be liquid left in the pan). Remove from heat.

Holding the bok choy in one hand so that the outer leaves create a container, spoon the mushroom mixture into the center. Gather the top of the leaves together and gently lay into a lightly oiled roasting pan. Drizzle an additional teaspoon or two of sesame oil over the bok choy and cook for 20 minutes. The top outer leaves will be a bit crispy and the stalks will be a vibrant green. 


Comment

Comment

Rice Balls Two Ways: with Dead Simple Chunky Chia Fig Jam and with Spiced Pickled Kale

rice balls two ways.jpg

Adorable, portable, and with the right fillings, a real treat to pull out when you need a pick-me-up, onigiri are easy to love. And with the plastic wrap method, easy to shape. Sweet or savory, white rice or brown, make sure you take the extra minute to toast the sesame seeds. It takes very little effort, and because they're the only seasoning the rice gets (aside from the filling, of course), their beautifully nutty flavor really shines. 

Note that not all brown rice will work for rice balls, but we used the short grain variety (not labeled as sushi rice) available in the bulk section of Three Rivers co-op with great results. 

And, finally, this week's post is arriving a bit early, but we'll return to our normal schedule next week. 

Stuffed Rice Balls (Onigiri)

Print the recipes 

yields 11 rice balls 

2 cups uncooked sushi rice, white or brown [see note on rice, above]

2 TBSP sesame seeds

For the filling: 

1 batch Dead Simple Chunky Chia Fig Jam, recipe follows

or 

3/4 cup Spiced Pickled Kale, recipe follows

Bring 4 cups (1 quart) of water to boil. Add rice, cover, bring back to a boil, and reduce heat to low. Let cook 25 minutes, or until the rice has absorbed all the water.

While the rice cooks, toast the sesame seeds until fragrant in a dry skillet. Set aside and let cool. When the rice is cooked, transfer it to a clean work surface, spreading it out, and allow to cool for a few minutes. 

Line a small bowl with a piece of plastic wrap. Place 1/2 cup rice into the bowl, make a well in the center, and add 1 generous tsp of fig jam or 1 TBSP of pickled greens to it. Pull the sides of the plastic wrap up and twist tightly at the top, keeping the plastic very close to the rice and being careful not to trap air (which will make your plastic likely to tear while you shape). Press and shape with your hands, remove from the plastic and sprinkle both sides with sesame seeds. Continue with remaining rice and filling.

fig jam.jpg

Spreadable figs! 

Dead Simple Chunky Chia Fig Jam

6 large dried Turkish figs

1/2 cup unsweetened apple juice

pinch salt

1 tsp chia seeds

Chop the figs into a small 1/4-inch dice. Gently simmer the figs, apple juice, and salt until the figs are very tender, 5-7 minutes.

Meanwhile, process the chia seeds to a powder in a coffee grinder. (Chia seeds will thicken the jam in their whole form, but will remain crunchy. Here, you really want the fig seeds to be the only seeds under tooth, so it's best to powder the chia.) 

When the figs are soft and have begun to break down, remove them from heat, stir in the chia powder and let thicken for at least 20 minutes before using. Transfer to the fridge for longer storage. 

pickled greens.jpg

We're in love with this stuff. Nice in the rice balls, for sure, but there aren't many foods this won't improve. Our current favorite, totally delicious, wonderfully instant sandwich: pickled kale, Tomato Head hummus, and plain Twin Oaks tofu (we don't even bother to press it for this) on wheat. Grill and devour. The following recipe makes enough for 1 quart jar, which lasts only a week or two in our kitchen. Luckily, this recipe is simple to assemble, so a new batch is never far away.  (While we're waiting for the new kale, we happily munch on the pickled onion, dulse, and jalapeno from the bottom of the previous jar.)

Spiced Pickled Kale

adapted from Canning for a New Generation via The Perfect Pastry 

2 cups apple cider vinegar

1/3 cup balsamic vinegar

2 TBSP water

1 1/2 tsp fine sea (or kosher) salt

2 tsp natural cane sugar

2 bunches fresh lacinato kale (about 20 oz total weight), stemmed and cut into scant 1/2-inch ribbons

1 TBSP brown mustard seed

1 tsp whole allspice berries

1 tsp green cardamom pods, lightly crushed

1 large jalapeno (about 1 oz total weight), thinly sliced

2 cloves garlic, crushed

1/2 small onion (2-3 ounces' worth), thinly sliced

1/2 cup (scant 1/2 oz) dulse, chopped

In a small pot, bring the vinegars, water, salt, and sugar to a boil and simmer for 5 minutes. (Do this even if you're not canning for long-term storage--it mellows the vinegar.)

Meanwhile, in a quart jar, layer the onion, garlic, jalapeno, dulse, cardamom, allspice, and mustard seeds.  Stuff the greens on top (you'll really have to do some cramming, but they'll shrink after you pour the hot vinegar in). When the vinegar is ready, pour it into the jar. Press down the greens as necessary to submerge and put on the lid. Let cool at room temperature overnight, then transfer to the fridge.

Comment

Comment

Anytime Saucy Chiles Rellenos

chiles rellenos.jpg

This lighter version of chiles rellenos makes a killer breakfast (so you can imagine how long they'd last on a brunch table), but they're still filling enough for dinner. There's a lot to love: Big, spicy chiles loaded with a heap of dark beans smothered in a thick cashew sauce made flavorful in a snap by adding prepared salsa.

Rather than the usual chiles rellenos method (roast, then peel, seed, stuff, batter, and fry), this healthy recipe calls for simply stuffing the peppers from the top and kicking up your feet while the oven does the work. The only downside is a long roasting time, but we'll take inactive periods over a mountain of fuss every time. Plus, remember that while you're making dinner, you're also knocking out tomorrow's breakfast.

chiles rellenos detail.jpg

Anytime Saucy Vegan Chiles Rellenos

Print the recipe 

serves 3-4 

5-6 large poblano peppers (4-5 inches long, about 3 inches wide at the top) 

1/2 cup raw, unsalted cashews

1/4 cup nutritional yeast

1 tsp corn starch

1/2 tsp fine sea or kosher salt

3/4 cup water

1/2 cup prepared salsa [see Note] 

1/4 cup chickpea flour

1 15-oz can dark beans such as pinto, kidney, or azuki, drained and rinsed

1/2 TBSP olive oil

Preheat the oven to 400. 

Cut a large opening around the stem of each poblano. Pull out the stems, shake off any loose seeds, and reserve (lay each stem next to its pepper so you know which came from which). Remove any seeds and thick membranes from the body of the peppers. Set aside. 

In a coffee grinder, grind the cashews into a powder. Transfer to a pot and whisk them together with the nutritional yeast, corn starch, salt, and water. Cook until the mixture becomes a thick paste, 4-5 minutes. Whisk in the salsa, then whisk in the chickpea flour. Stir in the beans. 

Spoon the filling into each pepper, replace the stems (this will keep the filling from leaking out during baking), and transfer to a baking dish. Drizzle the oil over the peppers. 

Bake, loosely covered, for 1 hour. Uncover, and cook an additional 20 minutes.

[Note: For the salsa, we recommend a piquant, smoother variety such as Herdez Taquera. If you're sensitive to heat, try using a chunkier, milder salsa like Big S Farms Smoke on the Mountain, but puree it separately before adding it to the sauce to maintain the texture.]

Comment